¶ Nginx Proxy Manager
¶ Introduction
Nginx Proxy Manager (NPM) provides a web interface to configure the popular web server Nginx as a reverse proxy. It can be used for many purposes, but this guide will describe using it to provide HTTPS/TLS termination for other applications running on your TrueNAS system.
¶ Prerequisites
- You must own or control an actual public domain. That domain doesn't need to be accessible from the public Internet, but it must have public-facing DNS records. This guide will use
example.comas a placeholder for this domain. - You do not need to open or forward any ports on your router, or otherwise make anything on your LAN accessible to the Internet. You can if you choose, but that is outside the scope of this guide.
- To follow this guide exactly, you must host your domain's DNS at Cloudflare. Cloudflare provides free DNS hosting, among many other services (not all of which are free).
- Your DNS provider matters because we're going to be obtaining certificates from Let's Encrypt, and that requires they validate your control over your domain. In order to do that without exposing your apps to the public, NPM will need to be able to make updates to your DNS records.
- NPM supports many other DNS hosts, and you should be able to adapt this guide to them, but this guide will be using Cloudflare.
- You've generated an API Token from Cloudflare that you'll use to allow NPM to make these changes.
- This token must have permissions of
Zone:Zone:ReadandZone:DNS:Edit.
- This token must have permissions of
- You can control your local DNS, making custom entries to point names of your choosing toward IP addresses on your LAN.
- You can use router software like OPNsense or pfSense for this, use a local DNS server like Pi-Hole, or any other means.
- This is required because the certificate you're going to generate will cover names, not IP addresses. Browsing by IP (even if it were possible) would give you certificate errors.
- This is also required because NPM will use the requested hostname to determine the proxy target. Browsing to the IP address will just give you the default NPM welcome page, not the app you're looking for.
- As a distinctly suboptimal alternative, you can put entries pointing to your LAN devices in public DNS.
- You're running TrueNAS SCALE Electric Eel (24.10) or later. This version completely changed how apps work, so this guide will not be applicable to any earlier version of TrueNAS.
- This guide will be using the point-and-click apps ecosystem in TrueNAS SCALE. There are many other ways to configure NPM, including custom Compose apps, that are outside the scope of this guide.
¶ Preparation
¶ GUI Settings
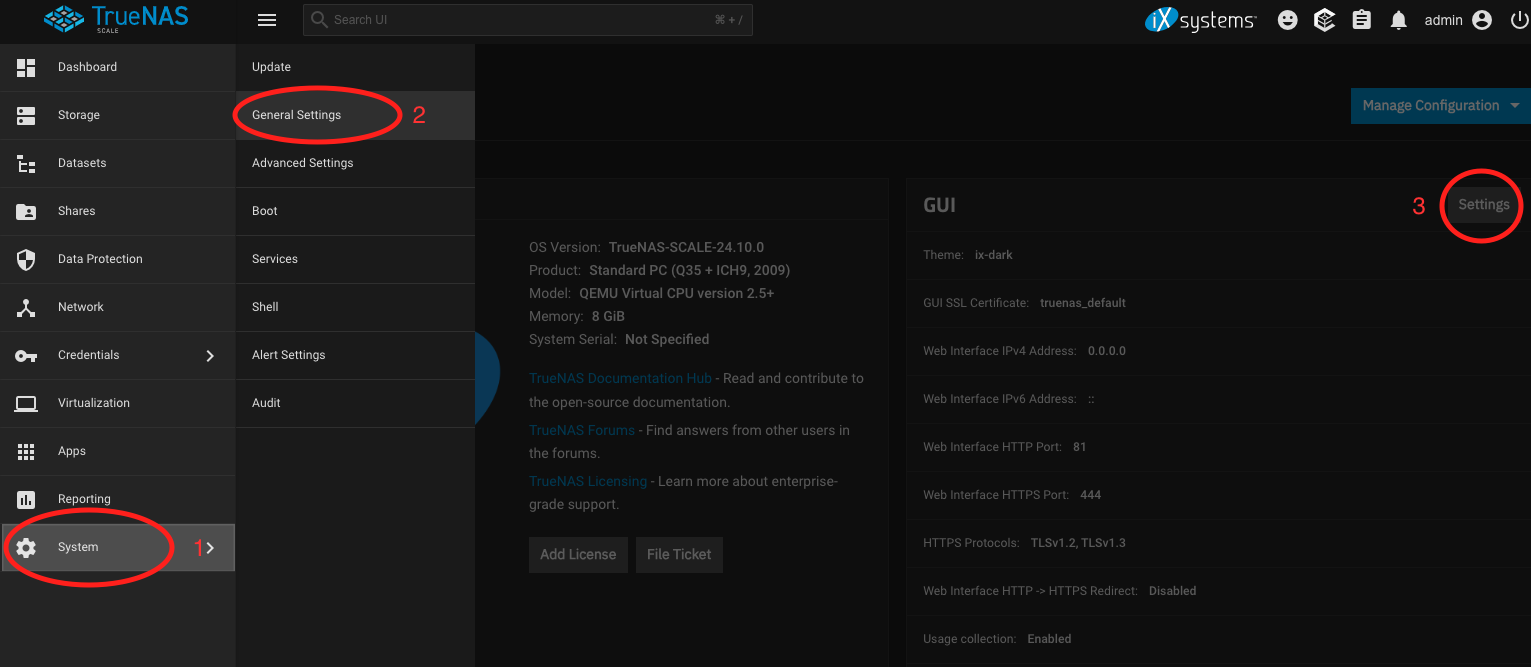
NPM will need to listen on ports 80 and 443 of your system, and by default the TrueNAS web interface already does that. You'll therefore need to change this. In the TrueNAS web interface, go to System (1) -> General Settings (2), then click Settings in the GUI section (3).
Change HTTP port to 81 (1), and HTTPS port to 444 (2), then click Save.
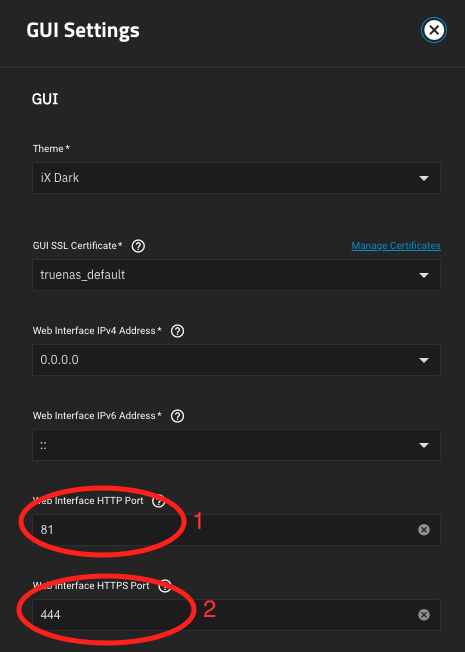
You can substitute other ports if desired. Confirm the restart of the web GUI.
At this point you'll probably need to log back into the web interface. Browse to http://ip_of_truenas:81 and do so.
¶ Docker Network
You'll need to create a Docker network where your apps will live, so they can sit behind NPM. As of this writing in July 2026, this must be done at the shell of your NAS. Log in as your administrator and run sudo docker network create proxy.
¶ Install NPM
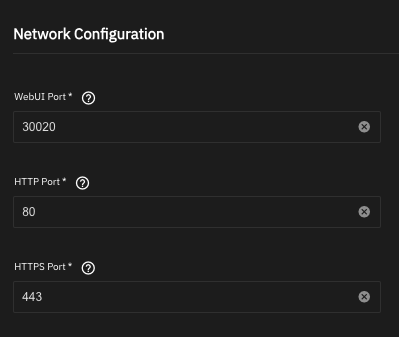
In the TrueNAS web interface, browse to Apps, then click Discover Apps. Find Nginx Proxy Manager and click Install. Set the HTTP port to 80, and the HTTPS port to 443. You can also change the WebUI Port if desired, but the remainder of this guide assumes you've left it at the default.
Below, next to Networks, click Add. In the Name field, type proxy, then next to Containers, click Add. Under the Container Name dropdown, choose npm. Leave the other fields at their defaults. The result should look like this:
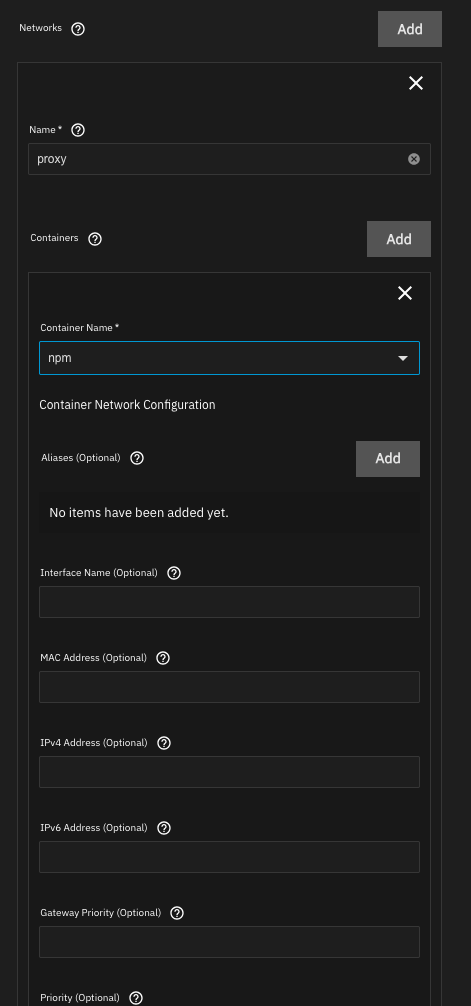
Then click Install. Let the application deploy, which may take a few moments.
¶ Install another app
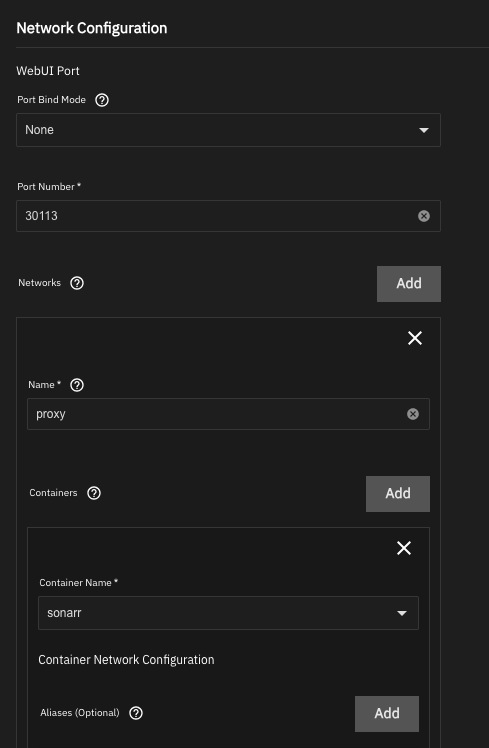
This guide will use Sonarr as an example, but will highlight only the network-related settings. Go back to Discover Apps, find Sonarr, and click Install. Set its options as desired until you reach the Network Configuration section. Set the Port Bind Mode for the WebUI port to None. Make a note of the port number; you'll use it below. Then add the sonarr container to the proxy network, much like you did with NPM above. The result will look like this:
¶ Configure NPM
¶ DNS preparation
Create a local DNS record pointing npm.lan.example.com to the IP address of your NAS.
¶ Log in
To access the NPM UI, browse to http://ip_of_truenas:30020. You'll be prompted to create an administrator's user and password.
¶ Create a certificate
For this step, you'll need your domain name and the API token. It's recommended that you reserve a subdomain for your LAN resources, e.g., if your domain is example.com, you'd use lan.example.com for your local domain.
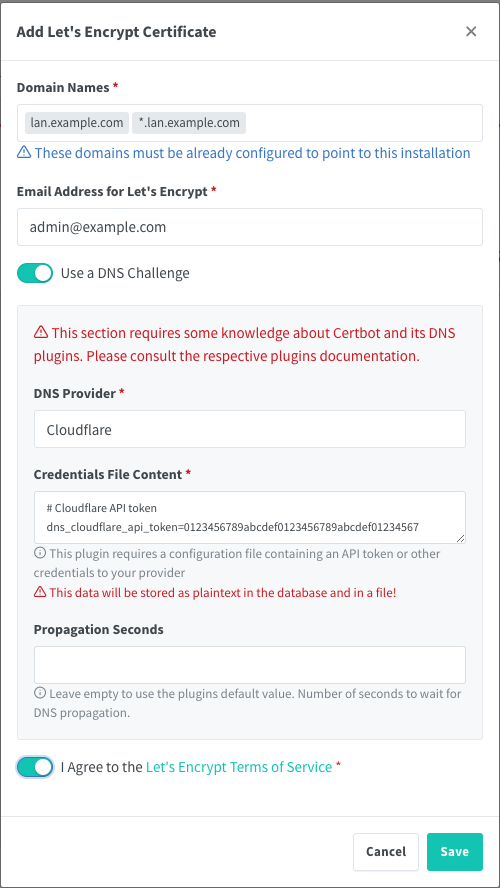
In the NPM UI, go to SSL Certificates, and click Add SSL Certificate, and from the menu that follows, Let's Encrypt via DNS. For domain names, enter both lan.example.com and *.lan.example.com. Enter your email address--Let's Encrypt will use this to notify you if your certificate is about to expire.
From the DNS Provider drop-down, choose Cloudflare. When you do, Credentials File Content will change to look like this:
# Cloudflare API token
dns_cloudflare_api_token=0123456789abcdef0123456789abcdef01234567
Paste in your API token after the = (replacing 0123456789...), leaving everything else the same.
The form should look like this:
Then click Save. Creation of the certificate will take a few moments, and you'll be returned to the SSL Certificates page.
¶ Create a host
Now that you've created a wildcard certificate, let's create a proxy host for one of your apps. Still in the NPM UI, go to Hosts -> Proxy Hosts and click on Add Proxy Host.
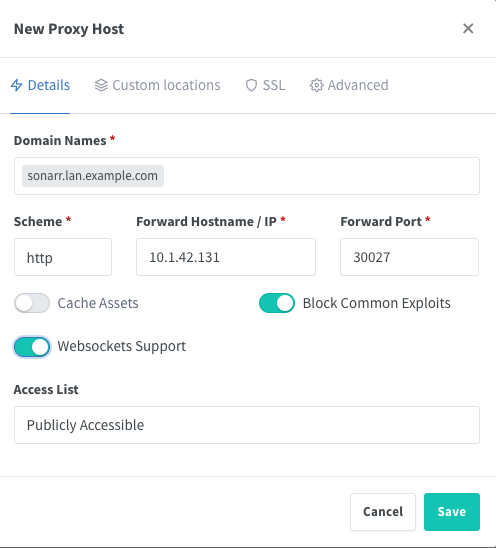
On the Details tab, start by entering the FQDN you'll be using (e.g., if you're setting up a proxy for Sonarr, you might use sonarr.lan.example.com). You'll leave scheme set to http, and for Forward Hostname/IP you'll enter sonarr. In Port, you'll enter the port for that app (30113 by default for Sonarr--it will be the port that's set in the app configuration). Turn on websockets support and Block Common Exploits.
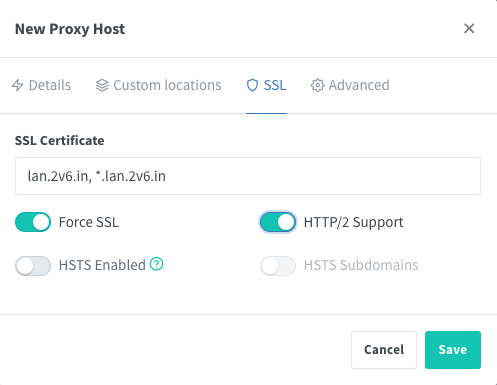
Then go to the SSL tab. Under SSL Certificate, select the certificate you created above. Click on Force SSL and Enable HTTP/2 support. HSTS is not recommended at this time.[1]
Click Save.
Finally, update your local DNS records to add this hostname as an alias of npm.lan.example.com.
¶ Test
Browse to the host you just created. You should see the page for that app, and your browser should indicate that HTTPS is enabled with a trusted certificate.
¶ Your NAS
We changed the listening ports for your TrueNAS installation to 81 and 444 above. To restore the ability to reach your NAS on the standard ports, you can add it as another host in NPM, as described above. You'd direct the host to port 81 and use a name like nas.lan.example.com.
¶ Repeat
Repeat the two steps above for any additional applications.
¶ Other Options
This guide has created a single wildcard certificate, in the expectation that any of your LAN services will use subdomains of lan.example.com. If that isn't the case for you, or if you'd just prefer to create individual certs for each service, you can dispense with creating the wildcard cert above, and instead have NPM create a new cert for each proxy host. Be aware of the Let's Encrypt rate limits should you decide to do this.
¶ Conclusion
This guide has described installation and configuration of Nginx Proxy Manager to allow TLS termination for the apps on your TrueNAS server. Consult the Nginx Proxy Manager documentation for more details on its configuration.
Following this guide will result in your applications only being available through NPM. You'll therefore be able to force SSL, use external authentication, and any other access controls you're able to implement through NPM.
HTTP Strict Transport Security (HSTS) is a security policy that requires clients, once they connect to your site/service, to only connect via HTTPS with a valid certificate for a certain time, ordinarily a year. If there's any issue with your TLS configuration--most likely that certificates fail to renew--this can lock you out of your services. Once you're sure everything's working properly and your certificates are renewing as they should, you can come back and enable HSTS if you choose. ↩︎