¶ Jellyfin
¶ Introduction
Jellyfin is a popular piece of software that allows you to organize and consume your media using a variety of devices. It is a free and open-source alternative to Plex Media Server, but lacks some of the features of Plex, most notably the ability to access your media when away from your LAN. You'll need to rely on other software for this purpose; Tailscale is one good option.
¶ Prerequisites
- You are running TrueNAS SCALE Electric Eel (24.10) or later. Due to drastic changes in the apps ecosystem, this guide is not expected to work with earlier versions of TrueNAS.
- You have already initialized the Apps system by choosing a pool.
- You've created at least one non-admin user on your system.
¶ Preparation
¶ Create a media dataset(s)
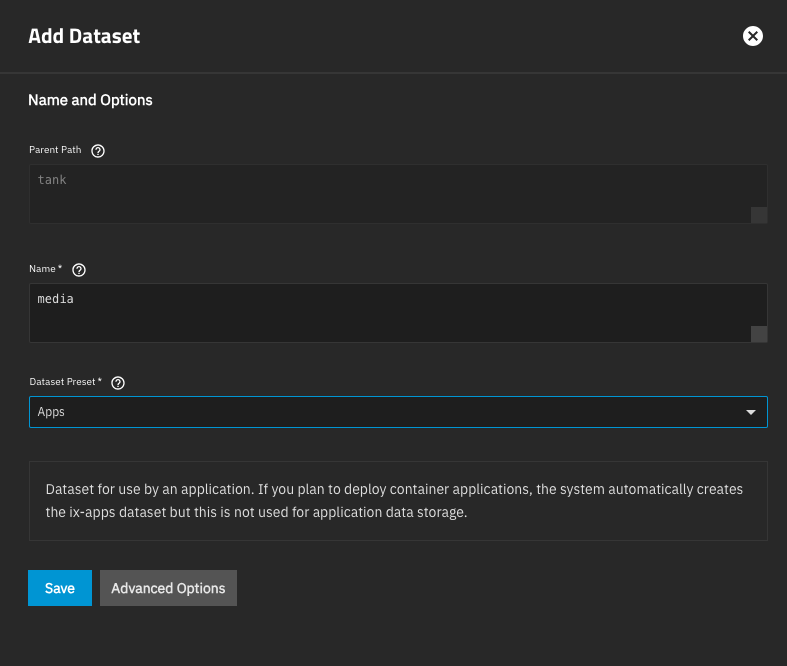
In the TrueNAS web UI, click on Datasets. Select your pool and click Add Dataset. Call it media, and set the Dataset Preset to Apps. Click Save.
Select the newly-created media dataset and click Add Dataset. Name this one for one type of media you'll have in your library (e.g., movies), set the Dataset Preset to Apps, and click Save. In the pop-up window asking you to set an ACL for this dataset, click Return to pool list. Repeat for any additional media types (e.g., TV, music, etc.).
¶ Create a Jellyfin dataset
Still on the datasets page, select your pool again.[1] Click Add Dataset and call the new dataset jellyfin-data. Again, set the Dataset Preset to Apps and click Save.

¶ Configure your user
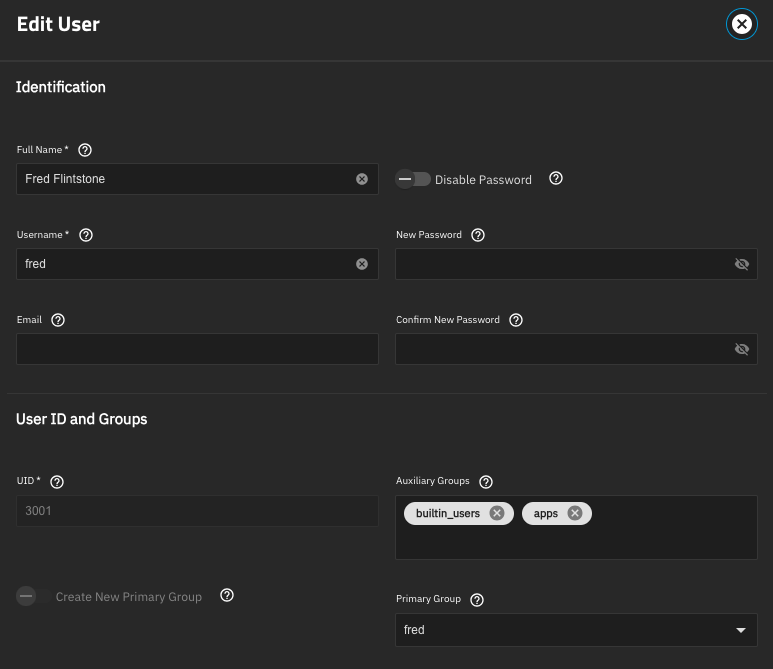
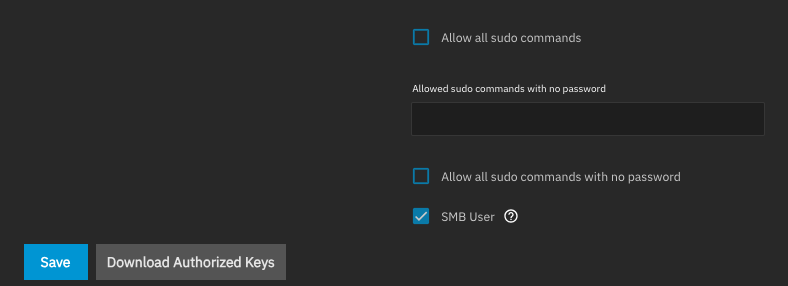
Browse to Credentials -> Users, click on your user, and click Edit. Make sure that user's Auxiliary Groups contains apps (add apps if it isn't present), and that the SMB User box is checked. Click Save. Repeat this process for any other users you want to have access to the media share you're about to create.
¶ Create a media share
Browse to Shares in the UI. Next to Windows (SMB) Shares, click Add. Under Path, browse to the media dataset you created above, then click Save.

¶ Test
On a desktop client computer, connect to your NAS via SMB. Log in as the user you edited above. Open the media share, and copy a few files into it. If this all works, you can proceed.

¶ Installation
¶ Install Jellyfin
In the TrueNAS Web UI, browse to Apps -> Discover Apps and find Jellyfin. Click Install.
Under Storage Configuration, set Jellyfin Config Storage to a type of Host Path, and select the jellyfin-data dataset.

Then, next to Additional Storage, click Add. Set the Type to Host Path, set Mount Path to /mnt/media, and browse to your media dataset under Host Path.

Then scroll to the bottom and click Install. Wait a few moments for the application to deploy.
¶ Configuration
Once Jellyfin deploys, click the Web UI button to open it.[2] You'll be greeted by the Jellyfin welcome page.
Chose your language, and enter a username and password for the admin account. At the next screen, click Add Media Library.

On the next screen, choose a content type (I'll use Movies for this example).

Then click the + next to Folders.
Browse to /mnt/media/movies, then click Ok. Click Ok again to add the library.

Repeat as needed for any other media types. When you're finished adding libraries, click Next. Keep clicking Next to proceed through the rest of the setup, and then sign in as the admin user you created.
¶ Test
Jellyfin will take some time to scan the media in your media dataset, and you'll see items show up on your dashboard as it finds them. Click on one of them and make sure it plays.

¶ Conclusion
These steps have left you with a basic Jellyfin installation. For further information and documentation, visit https://jellyfin.org/.
It's recommended that your apps live on an SSD pool, and generally recommended that app data of this sort do so as well. If you've set up a separate SSD pool for your apps, select that pool here. ↩︎
If you've enabled the HTTP->HTTPS redirect for your TrueNAS web GUI, this won't work. Instead, browse to
http://TRUENAS_IP:30013. ↩︎