¶ Caddy
¶ Introduction
Software installed using Docker, particularly using the default Compose files, will often place its web interface on a non-standard port, and rarely enables TLS/HTTPS. Both of these can be addressed using a reverse proxy, allowing you to (for example) browse to https://radarr.yourdomain rather than http://TRUENAS_IP:8686. Popular software for this purpose includes Nginx Proxy Manager and Traefik. The former provides a web interface for configuration, while the latter can be automatically configured in a variety of ways, including by Docker labels.
This guide will describe the use of Caddy as a reverse proxy/ingress controller for your TrueNAS System, including automatic configuration using Docker labels.
¶ Prerequisites
- You must own or control an actual public domain. That domain doesn't need to be accessible from the public Internet, but it must have public-facing DNS records. This guide will use
example.comas a placeholder for this domain. - You do not need to open or forward any ports on your router, or otherwise make anything on your LAN accessible to the Internet. You can if you choose, but that is outside the scope of this guide.
- To follow this guide exactly, you must host your domain's DNS at Cloudflare. Cloudflare provides free DNS hosting, among many other services (not all of which are free).
- Your DNS provider matters because we're going to be obtaining certificates from Let's Encrypt, and that requires they validate your control over your domain. In order to do that without exposing your apps to the public, Caddy will need to be able to make updates to your DNS records.
- Caddy supports many other DNS hosts, and you should be able to adapt this guide to them, but this guide will be using Cloudflare.
- You've generated an API Token from Cloudflare that you'll use to allow Caddy to make these changes.
- This token must have permissions of
Zone:Zone:ReadandZone:DNS:Edit.
- This token must have permissions of
- You can control your local DNS, making custom entries to point names of your choosing toward IP addresses on your LAN.
- You can use router software like OPNsense or pfSense for this, use a local DNS server like Pi-Hole, or any other means.
- This is required because the certificate you're going to generate will cover names, not IP addresses. Browsing by IP (even if it were possible) would give you certificate errors.
- This is also required because Caddy will use the requested hostname to determine the proxy target. Browsing to the IP address will just give you the default Caddy welcome page, not the app you're looking for.
- As a distinctly suboptimal alternative, you can put entries pointing to your LAN devices in public DNS.
- You're running TrueNAS SCALE Electric Eel (24.10) or later. This version completely changed how apps work, so this guide will not be applicable to any earlier version of TrueNAS.
- You've installed Dockge, as this guide will be using Dockge to install Caddy.
¶ Preparation
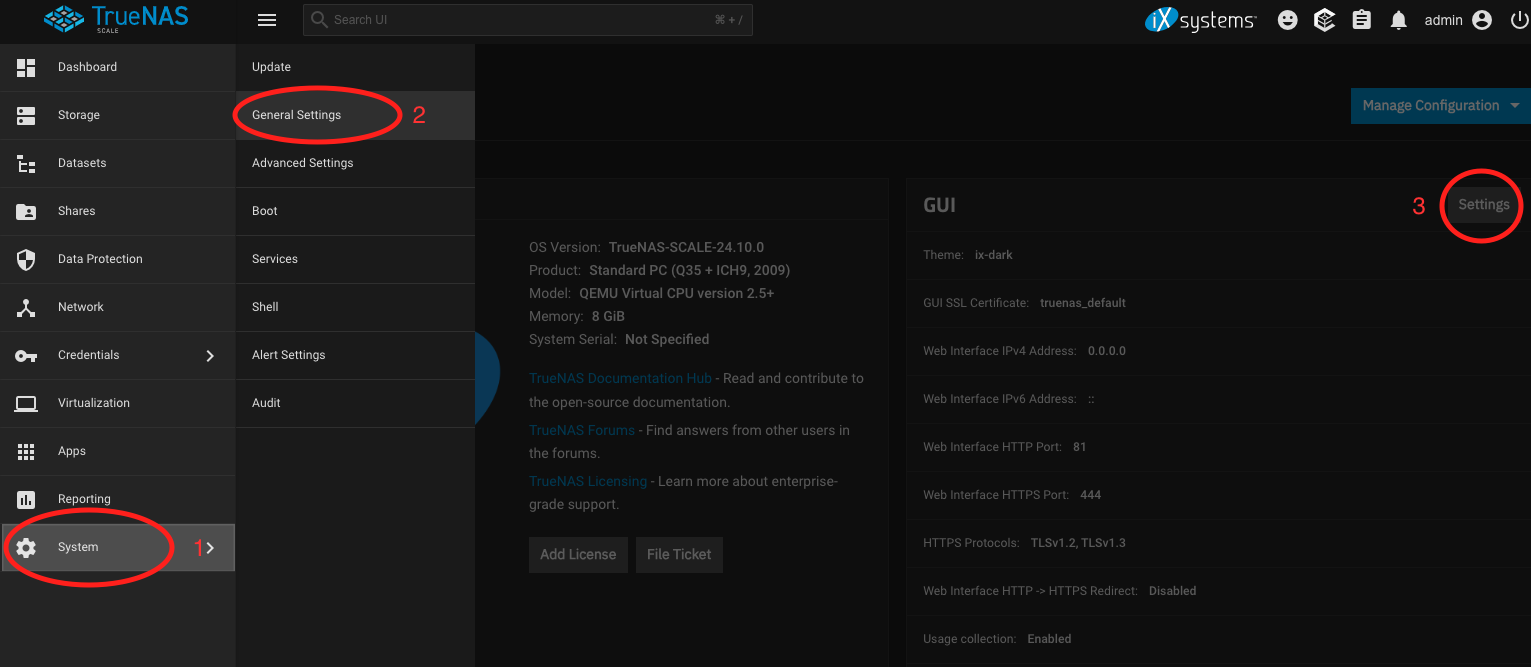
Caddy will need to listen on ports 80 and 443 of your system, and by default the TrueNAS web interface already does that. You'll therefore need to change this. In the TrueNAS web interface, go to System (1) -> General Settings (2), then click Settings in the GUI section (3).
Change HTTP port to 81 (1), and HTTPS port to 444 (2), then click Save.
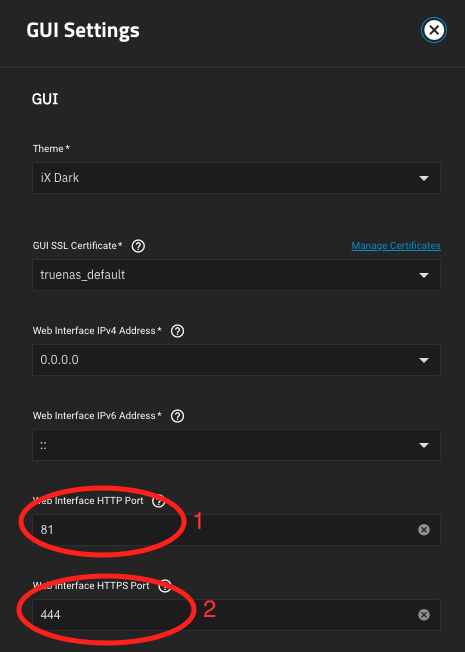
You can substitute other ports if desired. Confirm the restart of the web GUI.
At this point you'll probably need to log back into the web interface. Browse to http://ip_of_truenas:81 and do so.
¶ Installation
Browse to Dockge, click + Compose, and paste in the following YAML:
services:
  caddy:
    restart: unless-stopped
    init: true
    env_file: .env
    ports:
      - 80:80
      - 443:443/tcp
      - 443:443/udp
    volumes:
      - /var/run/docker.sock:/var/run/docker.sock
      - /mnt/software/docker/data/caddy/config:/config
      - /mnt/software/docker/data/caddy/data:/data
      - /mnt/software/docker/data/caddy/html:/usr/share/caddy
    labels:
      - caddy_0.email="{env.EMAIL}"
      - caddy_0.acme_dns=cloudflare
      - caddy_0.acme_dns.api_token="{env.CLOUDFLARE_API_TOKEN}"
      - caddy_1=(encode)
      - caddy_1.encode=zstd gzip
      - caddy_2="*.lan.example.com"
      - caddy_2.root="* /usr/share/caddy"
      - caddy_2.file_server
      - caddy_3=import /config/caddy/*.caddy
    build:
      context: .
    healthcheck:
      test:
        - CMD-SHELL
        - wget --no-verbose -T3 --spider http://localhost:80 || exit 1
      interval: 1m
      timeout: 10s
      retries: 3
      start_period: 30s
      start_interval: 5s
    pull_policy: missing
    networks:
      - proxy
networks:
  proxy:
    external: true
The paths above assume a dataset layout as described in the Dockge guide linked above, and that the pool is named software; adjust them to your requirements. Of course, you should also replace example.com with your domain name.
If you'd like to take advantage of Let's Encrypt's recently-available shortlived certificates, adjust the caddy_2 labels above to read as follows:
      - caddy_2="*.lan.example.com"
      - caddy_2.tls.issuer=acme
      - caddy_2.tls.issuer.profile=shortlived
      - caddy_2.root="* /usr/share/caddy"
      - caddy_2.file_server
You may specify a different certificate profile here if you prefer.
In the .env field below, paste in:
[email protected]
CLOUDFLARE_API_TOKEN=(your token)
Click Save; do not deploy this stack yet.
Now log in to the shell on your NAS, and browse to the directory for this stack--with the same assumptions as above, that would be /mnt/software/docker/stacks/caddy. Create a file called Dockerfile with your preferred text editor, with the following contents:
FROM caddy:2-builder AS builder
RUN xcaddy build \
  --with github.com/caddy-dns/cloudflare \
  --with github.com/lucaslorentz/caddy-docker-proxy/v2
FROM caddy:2
EXPOSE 80 443 2019
COPY --from=builder /usr/bin/caddy /usr/bin/caddy
RUN apk add --no-cache tzdata
CMD ["caddy", "docker-proxy"]
Save this file. You'll also need to create a Docker network; run docker network create proxy (or sudo docker network create proxy if that fails).
¶ Alteration for different DNS providers
The Dockerfile above builds Caddy with the Cloudflare DNS plugin as well as the caddy-docker-proxy plugin--the former is required to validate domain control using Cloudflare's DNS, while the latter allows you to configure Caddy using Docker labels. If you're using a different DNS provider, find its plugin at the caddy-dns repository and edit the Dockerfile accordingly. You'll also need to adjust the Compose file above to reflect your DNS provider and its credentials, and also the .env file to reflect those credentials.
¶ Deploy
Return to Dockge and click the Deploy button for this stack. This will likely take a few minutes, as your system will need to build the Caddy binary to include the plugins you've specified. Once it finishes, you should see the log output indicating (among other things) that Caddy has obtained a certificate for *.lan.example.com.
¶ Usage
Now that you have Caddy running, how do you use it? In the simplest case, add two Docker labels, and remove any port mapping. Given this example:
services:
  jellyfin:
    image: jellyfin/jellyfin
    container_name: jellyfin
    user: 568:568
    volumes:
      - /mnt/software/docker/data/jellyfin/data:/config
      - /mnt/software/docker/data/jellyfin/cache:/cache
    restart: unless-stopped
    environment:
      - JELLYFIN_PublishedServerUrl=http://TRUENAS_IP:8096
    ports:
      - 8096:8096
You'd change it to read as follows:
services:
  jellyfin:
    image: jellyfin/jellyfin
    container_name: jellyfin
    user: 568:568
    volumes:
      - /mnt/software/docker/data/jellyfin/data:/config
      - /mnt/software/docker/data/jellyfin/cache:/cache
    restart: unless-stopped
    environment:
      - JELLYFIN_PublishedServerUrl=https://jelly.lan.example.com
    labels:
      - caddy=jelly.lan.example.com
      - caddy.reverse_proxy="{{upstreams 8096}}"
    networks:
      - proxy
networks:
  proxy:
    external: true
Note the changes:
- The
portsmapping is removed, because you're no longer directly exposing any ports from this container to your network. - You've added two
caddylabels, one specifying the FQDN to proxy, the other specifying the port to proxy to. - You've put this container on the
proxynetwork, which you created above; Caddy will communicate with all the services you're proxying via this network.
Finally, update your local DNS records to point the hostname of jelly.lan.example.com to the correct IP address.
¶ External hosts
The instructions above have demonstrated adding labels to your compose.yaml files to configure Caddy, but that won't work if you want Caddy to proxy to hosts that aren't running via Docker. To do that, you can take advantage of the import directive included in Caddy's compose.yaml, and add Caddyfile snippets in the /config/caddy path.
For example, to proxy to your NAS on the standard ports (because you changed the UI to use non-standard ports earlier in this guide), create a file at /mnt/software/docker/data/caddy/config/caddy/nas.caddy with these contents:
nas.lan.example.com {
    reverse_proxy 192.168.1.10:81
}
...and then restart the Caddy stack.
¶ Conclusion
This guide has described installation and configuration of Caddy to allow TLS termination for the apps on your TrueNAS server. Consult the Caddy documentation for more details on its configuration.
¶ References
- This guide follows, with slight alterations (most significantly, the use of Dockge), the method described at https://forums.truenas.com/t/electric-eel-how-i-am-using-dockerfile-env-files-compose-files/15252
- Caddy Documentation
- Caddy Docker Proxy
- Caddy Forum