Whilst it is tempting to move straight to installing your TrueNAS operating system as soon as you have finished building your hardware, instead we urge you to take a bit of time to test your hardware (as best you can considering you don't yet have TrueNAS installed). Once we have TrueNAS installed we will recommend more tests, but at this stage we recommend some low-level tests.
Statistically speaking electronic equipment tends to fail towards the beginning of its life cycle or towards the end.
So when buying hardware to build a server, how do we know if we have a component or device that will fail early or towards the end of its life cycle?
We don’t know. So we stress the hell out of it before entrusting it with any data to see if it will fail (Fester takes a similar approach with underwear). If it doesn’t it is probably (statistically speaking) going to give good service. This is basically hardware validation.
The areas that usually get stress tested are the processor, memory and the HDDs in the server, although technically you can stress test anything in a computer if you have the relevant tool (Fester can be found stress testing his head with a hammer when he forgets his medication).
Stress testing usually takes the form of running a piece of software on the server that intensely and repeatedly tests (and therefore stresses) a particular component or device in the server (i.e. memory, processor, etc). The generic term for software of this type is “burn-in” software.
You can place a monitor and keyboard on the server or use IPMI to administer and observe the tests.
Fester puts the server in its final location at this point (in my case the living room) and monitors through IPMI. This is because when monitoring temperatures during the validation tests, I want to see how hot the server will get with the given ambient temperatures in the final location. This will give me a truer picture of how hot the server could get (mine is next to a radiator, not the smartest choice, but there were no other options without upsetting the psychopath).
This section discusses using discrete software tools to check out the CPU, memory, and hard drives on your system. Most of these tools, or equivalents, are also available in a single package on the Ultimate Boot CD[1].
[1] The Ultimate Boot CD download is a CD-sized ISO file - you can burn it to a physical CD, use Rufus or the more complicated Customizing UBCD instructions to write it to a bootable USB Flash Drive, or if you have IPMI it can be mounted as a virtual CD over the network.
¶ Processor Validation
The purpose of processor validation is to ensure that your processor will remain stable under stress and won't overheat i.e. that there is sufficient passive or active heat dissipation. Processor validation is carried out by running a program on the server which works the processor at 100% of its capacity, 100% of the time. That means all threads in all cores working at 100% (or very near to 100%) all the time.
These types of programs are generically referred to as “CPU Stress Testers” and there are various free ones available on the internet.
There is no generally agreed duration for this test. I ran it for an hour.
Make sure you carefully observe the temperature of your processor during this test, especially if you have built a quiet system as temperatures in these servers tend to run a little higher due to the much slower fan speeds.
Fester uses the free version of a program called Breakin by Advanced Clustering, run from a bootable USB stick. Breakin comes as an ISO file (but can also be obtained as a PXE image if you want to do this stuff across a network and don't have IPMI).
Alternatively the Ultimate Boot CD has several stress test utilities, however CPUstress contains most or all of the others.
Prime95 is another CPU stress tester that seems to be popular with the TrueNAS community. Unfortunately Uncle Fester couldn't work out how to make this bootable. If you know how to do this, please feel free to contribute instructions below.
¶ Using Breakin
The first thing we need to do is make the bootable USB stick. Follow the instructions in Writing a USB Stick to write the Breakin image file to a USB Stick. You can alternatively burn it to a CD, or mount the file via IPMI. The screenshots and instructions below assume that you are using IPMI via iKVM but you can (obviously) use a physical screen and keyboard instead.
Insert the bootable Breakin USB stick and switch on the server.
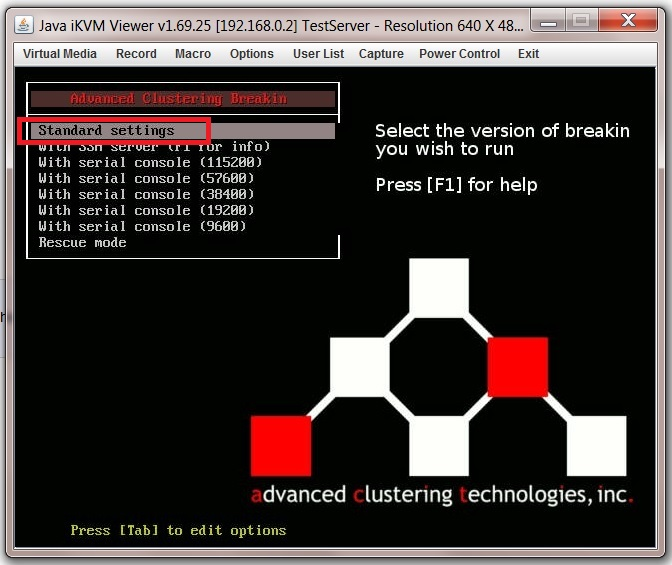
If all goes well you will eventually be presented with a screen like this. Chose the “standard settings” option by using the “↑” and “↓” keys and then press the “Return/Enter” key.
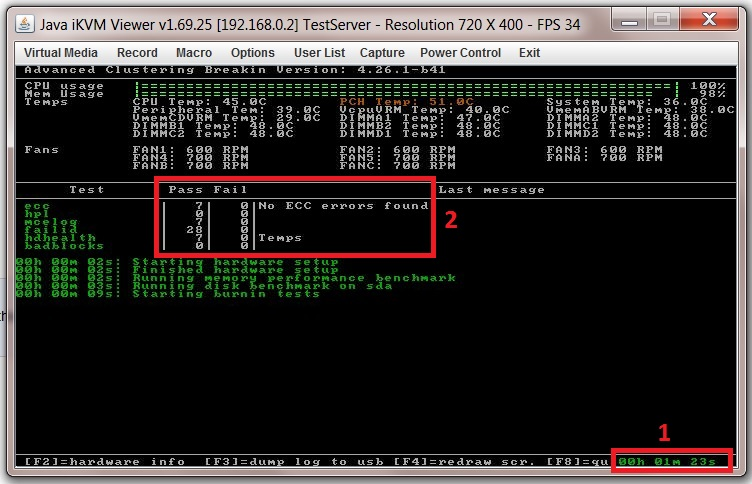
When it is finished loading you should see something like this with the test duration at the bottom of the screen (1).
Any failures will be listed in the “Fail” column, with the number of times the test passed in the “Pass” column just to the left of this (2).
Keep an eye on the temperatures especially if this is a quiet server build.
There should be zero failures.
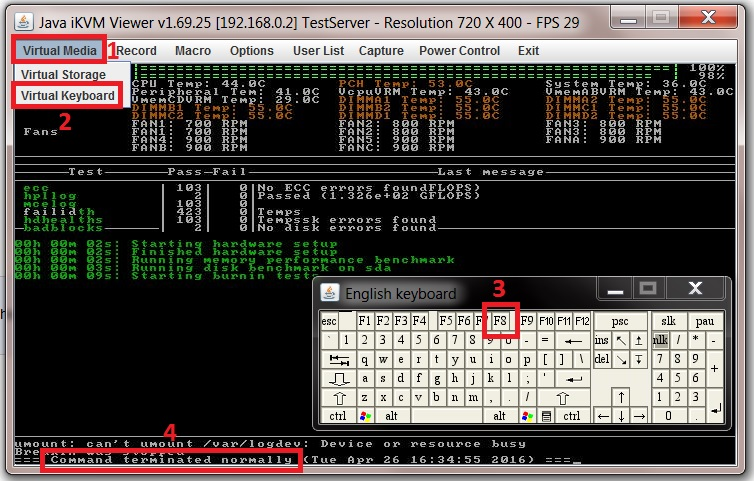
If at any point you need to stop the test open the virtual keyboard by selecting “Virtual Media” (1) from the drop down menus along the top of the iKVM Viewer. Now select “Virtual Keyboard” (2) and click with your mouse on F8 of the virtual keyboard (3).
Pressing F8 on your actual (i.e. physical) keyboard will not work.
If this works you should see something like this with “Command terminated normally” (4) at the bottom of the screen.
When you think the CPU has been thoroughly tested, power off the server and remove the USB stick.
¶ Memory Validation
Memory validation is performed by running a piece of software on the server that basically writes data to a memory location, reads it back and then checks that the contents are correct. In order to detect various types of memory issues, several different patterns are written and read back. Because it tests several patterns on each and every byte of memory, memory tests can take some time.
The program can perform a variety of different tests usually specified by the user. It may also start the whole process all over again from the start after completing all the tests specified until the program completes or is stopped by the user.
Uncle Fester uses “MemTest86+” for memory testing from a USB stick, but there are many other free memory testers available.
Note: If you have a UEFI-based server (i.e. almost all reasonably modern hardware since 2010) then there is a UEFI-based version of MemTest86+ - though you may need to add it to the UEFI partition and Grub manually.
¶ Using MemTest86+
Download the “MemTest86+ USB Drive” ISO image for Windows. Unzip the file and write it to a USB stick or mount via IPMI.
Insert the USB stick and power up the server, and it should boot into the MemTest86+ start up screen as shown.
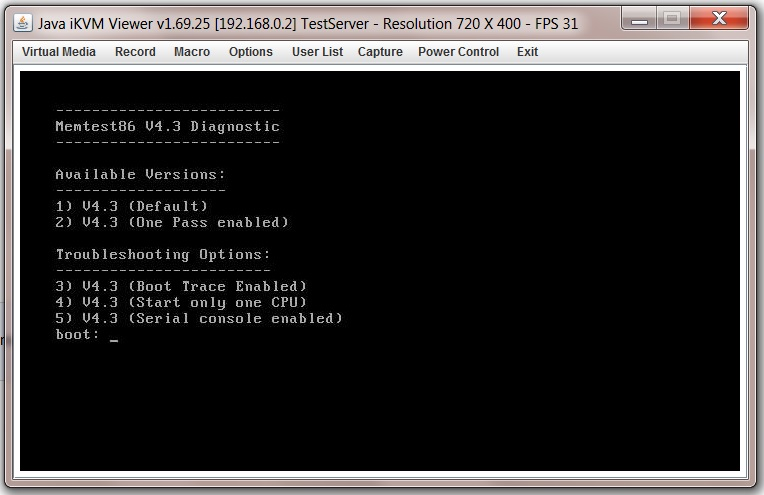
If you are happy running the default tests, then when the start up screen appears do nothing, don’t hit any keys just wait and after a short period of time MemTest86+ will just launch into the default tests with no user intervention.
Fester uses the default tests (I don’t know if this is a good or bad idea, perhaps someone has some advice on this so I can improve the guide).
When MemTest86+ is conducting the tests you should see a screen that looks something like this.
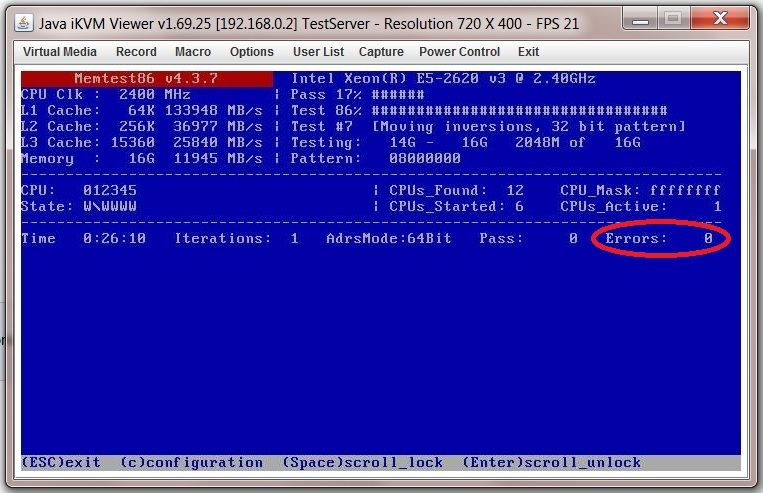
I ran the test for 24 hours. But some people run this test for days or even weeks!
The test should return zero errors (circled in red in the previous screen shot). If you get even one error then this might be a faulty module/s and should be returned for testing. It cannot be used for the TrueNAS server as it will likely cause corruption in the ZFS file system.
When you are finished press the “Esc” button (this will reboot the server) or switch it off with the power button.
¶ HDD/SSD Validation
Due to the length of this section, it is on a separate page.